INSTRUCTIONS FOR SUBCUTANEOUS SELF-INJECTIONS
STEP 1: GATHER SUPPLIES
Wash your hands with soap and water and assemble the following items:
- 1 medication vial
- 2 alcohol prep pads
- 1 syringe
- sharps container (TIP: you can also use an empty detergent or bleach container)

STEP 2: PREPARE THE SYRINGE
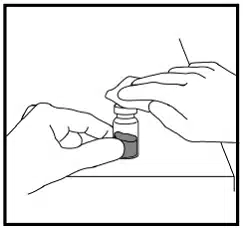
Pull the tab on the center of the vial cap to expose the top of the rubber stopper. Use an alcohol pad to wipe the top of the vial. This will kill any bacteria on the vial.
Take the syringe out of its package. Remove the cap from the needle. Be very careful not to let anything touch the needle. If anything touches the needle, throw away the entire syringe away in the sharps container and use a new one.
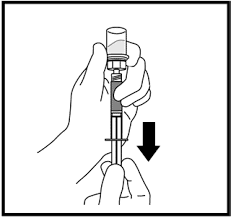
Turn the vial and syringe upside down. Slowly pull the plunger down past your prescribed dose. This will help remove any air bubbles. Slowly push the plunger back up to your prescribed dose. Check the amount of medication in the syringe to make sure it's the correct dose.
Carefully remove the needle from the vial.

STEP 3: LOCATE THE INJECTION SITE
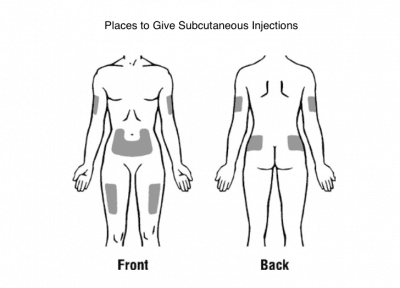
For the glute, with the help of another, inject in the upper, outer quarter towards the hip bone.
For the thigh, inject in the middle of the thigh, slightly towards the outside.
For the arm, with the help of another, inject in the back, thick skin of the upper arm.
For the stomach, inject in the middle of the stomach, two inches to either side of the belly button.
Make sure to alternate injection sites each time, either different locations or different sides of the body.

STEP 4: INJECT THE MEDICATION
Wipe down the injection site with an alcohol wipe. Hold the syringe between your thumb, index, and middle fingers like a pen or a dart.
Touch the needle to your skin and quickly slide it into the skin. Quickly push down on the plunger to inject the medication.
Once you have injected the medication, quickly pull the needle straight out of the skin.
STEP 5: DISPOSE OF THE NEEDLE
Place the syringe in the sharps container for safe disposal.


